In This Section
- Summer 2015
- Summer/Fall 2014
- Summer 2012
- Summer 2011
- Winter/Spring 2011
- Winter/Spring 2010
- Fall 2009
- Spring 2009
- Spring/Summer 2008
- Winter 2008
- Summer 2007
- Spring 2007
- Winter 2007
- Fall 2006
- Spring 2006
- Winter 2006
- Spring 2005
- Winter 2004
- Fall 2004
- Summer 2004
- Spring 2004
- Winter 2004
- Fall 2003
- Summer 2003
- Spring 2003-3
- Spring 2003-2
- Spring 2003-1
- Winter 2003
- Winter 2002
- Fall 2002-2
- Fall 2002-1
- Summer 2002
- Spring 2002-2
- Spring 2002-1
After a great vacation for everyone who works at Radon Boats, we are back and ready to start the New Year with a renewed sense of enthusiasm and commitment to building the best custom boats in the world. Looking back at 2002, we want to thank everyone who helped us throughout the year. We have a great amount of appreciation for our families, friends, employees, and customers for their continued support. We look forward to continuing the tradition of excellence at Radon Boats in the coming year!
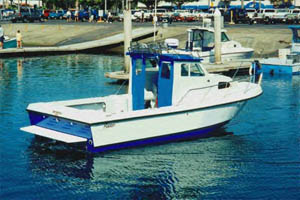
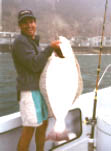
From time to time, we will be featuring boats that have been built in years past. Since this is the beginning of a new year, this is an excellent opportunity to look back on some of the more unique boats that we have built over the years. This month we are featuring a boat we built way back in the year 2000. That year, we delivered a custom 22’ Radon to John and Jackie Adams. John is a long-time boat enthusiast who loves to take his boat to Catalina to relax and fish with his family. Their boat is exceptional because of the way the cabin was built. Rather than the standard cabin that we use for the 22’, the Adams’ cabin has an open back, which is sometimes enclosed in canvas. This special design allows increased flexibility for the Adams Family.
Above left: The Adam’s 22’ pulls into the Santa Barbara Harbor launching ramp. Above center: John displays his freshly caught halibut off the coast of Malibu.
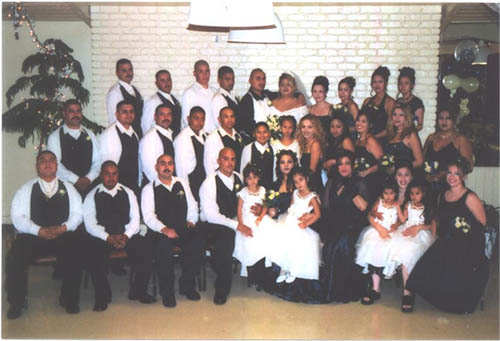
On New Year’s Eve, Rene Melgoza and his wife Diana renewed their wedding vows in an inspiring ceremony that took place in Lompoc. Rene is our assistant shop foreman and many of the members of the crew came to the event. Jose, who is Rene’s brother and a fellow employee, served as the best man in the wedding. Don greatly enjoyed the ceremony, commenting that “Everyone at the wedding seemed absolutely overjoyed by the outpouring of sincere emotions.” Jose was glad that the ceremony was held on New Year’s Eve, decrying enthusiastically, “It was a really good way to start off the New Year.” As for the man at the center of the wedding, Rene proclaimed “It was the best day of my life. It went by way too fast!” Indeed, Rene and Diana looked at each other with sincere love and mutual admiration as they renewed their vows. John, one of our outfitters who attended the wedding agreed, “The bride and groom looked great and seemed very happy.”
This month, the shop tip comes to us from the rigging crew. In this shop tip, we will focus on the art of installing hardware. The presence of hardware on the boat is both a practical and aesthetic necessity, adding to the functionality and beauty of the vessel. When installing hardware such as cleats, rod holders, hinges and so on, the primary step is placement. Once you install a piece of hardware, it is usually very difficult to take it out. Therefore, great care must be taken in properly positioning the item. As always with boat work, the old adage “Measure twice, cut once,” is the best advice to avoid making egregious errors. Now that we’ve spent sometime discussing the basics of placement, we’ll move on to the actual process of mounting. When drilling holes, make sure you use the proper size drill bit. The next step, which is absolutely imperative, is dry mounting. Dry mounting is important for two reasons: First, once you have the item bolted in place, you can make sure you have proper alignment; second, you give yourself the opportunity to verify that the bolts you chose are of the right length. This technique has other advantages, such as being able to correctly prepare the boat’s surface for the adhesive that you will use to permanently install the part. Once you have the part is in its proper place, put tape around the edges. Leave approximately 1/16’’ to 1/8’’ between the tape and the piece of hardware. Leave the tape down and temporarily remove the hardware. Next, make sure to rough up the mounting surface with eighty grit sand paper. Naturally, double check to see that the hardware is clean and dry. Now you are finally ready to mount your hardware. Once you have picked the proper sealant for your project, you are ready to permanently place the given piece of equipment. We mostly use Sikaflex 291 fast cure adhesive, but sometimes we also use marine grade silicone. Apply a liberal amount of sealant to the mounting surface and place the hardware in the appropriate position, making sure the sealant thoroughly covers the bottom of the item. Before placing the bolts in the holes, put sealant completely around the threads and about three-fourths the way down the bolt. Push the bolts through the holes and install the washer and nylock nuts. Your hardware is now mounted, and if you properly followed the instructions, there should be a bead of sealant oozing around the edge of the hardware. At this point, things can get messy unless you tend to the detail work. The best way to take care of the surplus sealant is to take a piece of thin cardboard and cut a 2’’ x 2’’ square out of it. Take the newly cut piece of cardboard and fold it in half. Then use this piece to scoop away the excess adhesive. Once you have taken care of most of this leftover mess, take a small rag and dip it in paint thinner. Clean around the edges of the hardware with the rag, cleaning any sealant that you were unable to get with the cardboard. Pull off the tape and voila! Your task is complete.
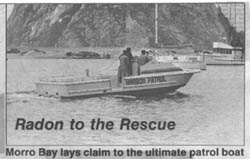
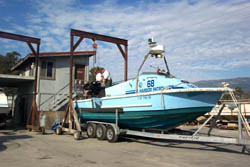
Recently, we had the opportunity to help the Morro Bay Harbor Patrol by installing new engines in their patrol boats. The original engines were twin 350 cubic inch, 260 horse-power Mercury gas engines with Bravo 2 outdrives. We replaced the old engines with twin 320 horse-power, 6.2 liter Mercury gas engines with, again, Bravo 2 outdrives.
Above left: Photo of Morro Bay Harbor Patrol Boat from a 1983 National Fisherman article. Above right: John and Greg work to update a classic.
The Radon Team newsletter has once again come to an end. But don’t despair; we’ll be back next month with more tips and photos from D.R. Radon Boat Building. If you have any questions, comments, pictures or ideas regarding the newsletter, e-mail us at [email protected]. We are always grateful for any contributions!
|